COMET layout
The Framework is based on a multi-thread python environment. Since python is generally not thread-safe and race conditions are often a problem, several precautions have to be made to safely share data between the different threads. In short, COMET has two main threads which are handling the data exchange between the GUI side and the measurement side of the program. For the GUI to send a new measurement job and the measurement thread to send data to the GUI for plotting a thread-safe way was established to exchange data between them. For more information on how to share data see chapter Data Exchange.
Main Structure
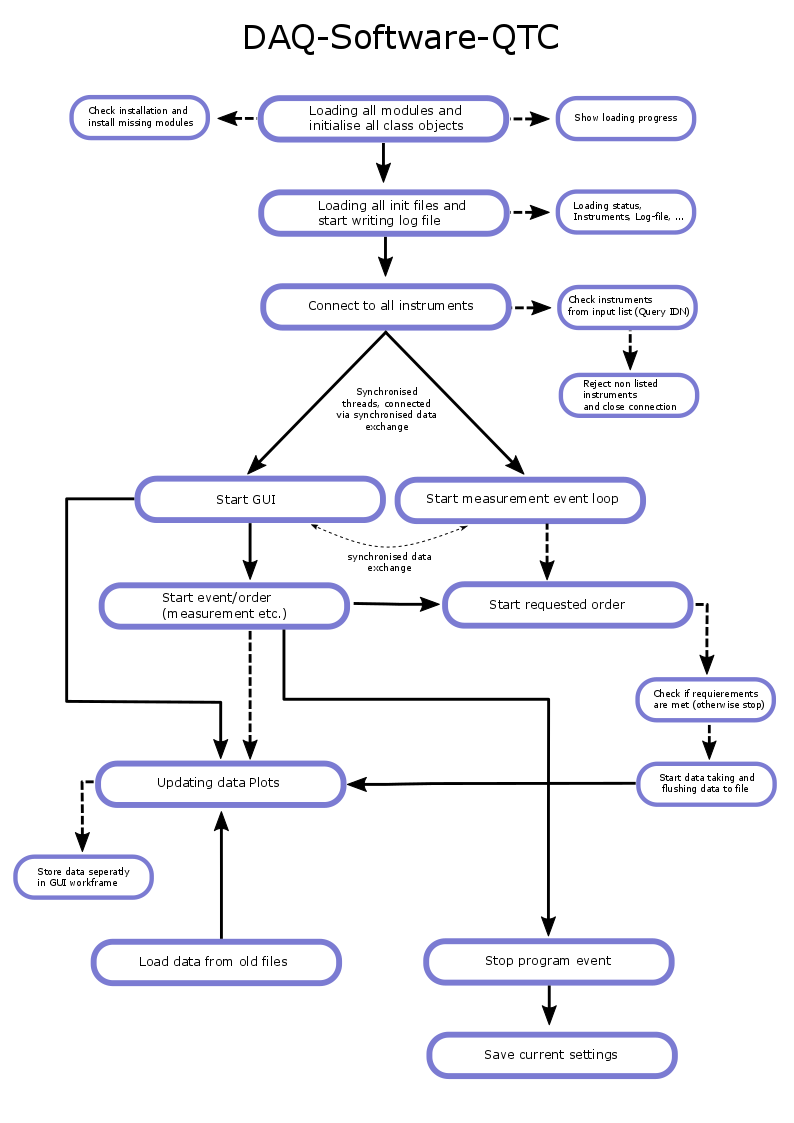
The picture below shows the main flow-chart of the framework. I will now give a summary of what the program does during boot-up.
It starts by loading all modules required for running, also check the availability of the modules. If the module cannot be found a message will be prompted and a request will be made if you would like to install it now.
Warning
A restart of the program may be needed, for them to work.
Furthermore, it prompts every action it takes while loading. After loading all modules, the init files, like default values and device config files are loaded. Furthermore, the actual log-file will be initialized. After all, this is done the framework tries to connect to all devices it has config files for and stores the information on the state machine.
Finally, two threads are spawned, one beeing the GUI-Thread and one beeing the measurement event loop thread (see next section)
Concerning the GUI-Thread: Here an event loop is established which can take on messages from other parts of the program, e.g. new data from a measurement or error messages or warnings.
Furthermore, it starts the 'additional framework functions' to continuously update plots and/or GUI elements. This functionality is provided by a NON-THREAD-SAVE state machine. This is necessary to not cripple the functionality or the speed of the program. To not have race conditions, the rule in the GUI-Thread is:
Caution
Never change variables that do not directly belong to the GUI. Only access non-member variables by read operations and check if the data is valid.
But DO NOT PANIC only a few variables are susceptible to race conditions (if you are using predefined work suits like the QTC-Software). If you are using a blank project, like it is described in the ??? section. EVERYTHING is safe and you can use it as you please. But be aware, you are the master of the thread save variables!!!
To stop the program, you have to send the right signal to the GUI-event loop. This message reads as follows: {"Status": {"CLOSE": True}}
Warning
If the close program message is sent from ANYWHERE in the program shuts down! But if a measurement is running, the program waits until the measurement is either finished or aborted correctly, it will not kill it.
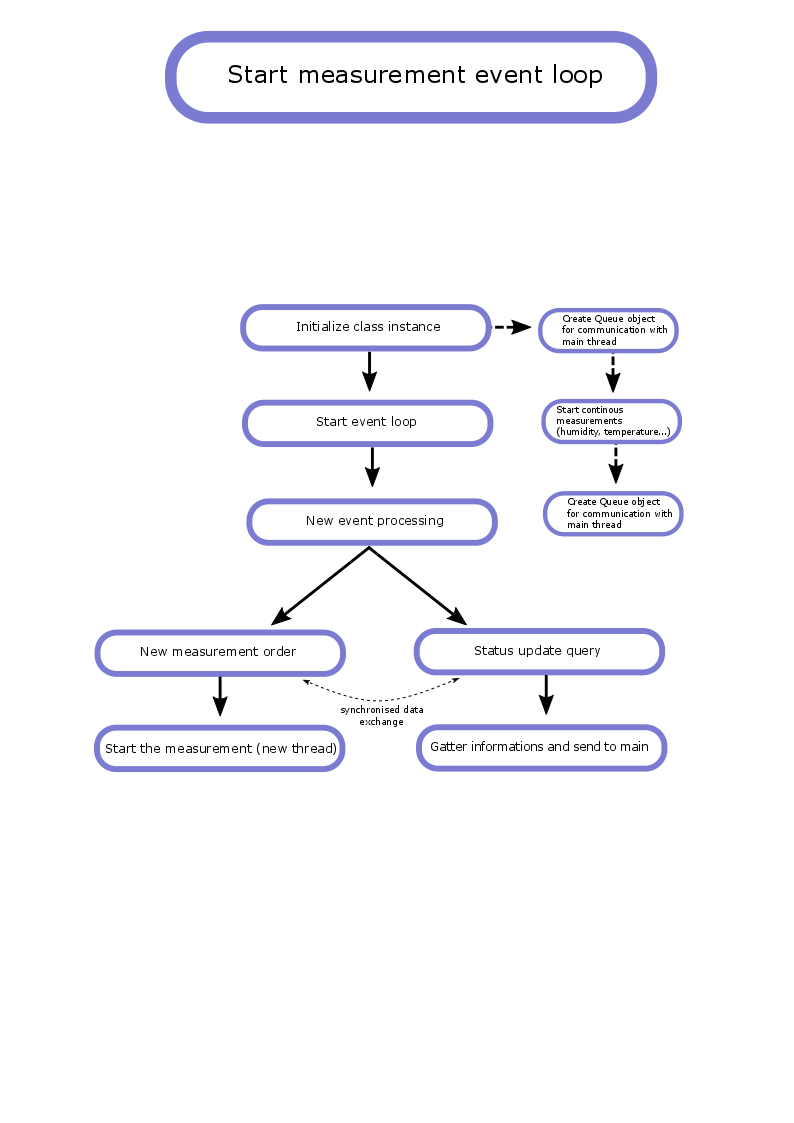
Measurement event loop
It first initializes all class instances like tools for measurements and supply functions like the queue objects for data exchange. It furthermore initializes continuous tasks, like the humidity and temperature control/surveillance. This continuous tasks can be extended as well.
After that, an event loop is established which waits for incoming messages from other threads. If one such message arrives, e.g. a new measurement job, then the framework takes actions accordingly to the flow chart below. If a new measurement should be conducted, a new thread will be spawned which solemnly conducts the measurement and is separated from the rest of the framework, except for a stop-action flag. This is due to code robustness. Imagine another part of the code consumes a lot of resources and/or crashes. Since the measurement thread is handling devices this thread may never experience lags or something like that.
Note
The actual mechanism how to start a measurement see chapter Measurement Job Generation, here a in dept explentation on how you start a measurement is explained.
Note
If a program bug is prevalent in the actual measurement routine this mechanism will not help. So be careful while programming the measurement routines!
Another type of messages, which the framework can handle are status update queries, these type of messages are not specific and can be extended. After gathering the required data, the thread sends the data back to the main thread.
Warning
This mechanism was mainly used in the early development phases and is now marked as deprecated. Status updates are now handled via thread-safe data structures, which do not need message-based data exchange.
The GUI event loop
In the beginning the GUI event loop does the same things as the measurement event loop. But its purpose is different. The GUI event handles incoming data packages for plotting, status and error message handling.
Starting with the error message:
If a message was sent to the event loop via the thread-safe queue in the form of {"ErrorCode": "Some error text"} than these message will be processed and stored in a list -which is a member of the GUI- called the "error.log". This can be used by the user to display all kind of messages, if the GUI is configured correctly.
Possible message types are: "Critical", "Info","MeasError", "DataError", "RequestError", "MEASUREMENT_FAILED", "Warning", "FatalError", "ThresholdError", "ERROR", "MeasError", "DataError", "RequestError", "MEASUREMENT_FAILED", "FatalError", "ThresholdError"
all types which have the word "error" in it will be marked red, warnings orange and info, green all others are rendered white.
Warning
This is not the actual log file the log file is a separate mechanism.
Furthermore, the event loop handles all messages concerning measurement procedure surveillance like: START_MEASUREMENT, ABORT_MEASUREMENT, CLOSE_PROGRAM, MEASUREMENT_FINISHED, MEASUREMENT_EVENT_LOOP_STOPED, MEASUREMENT_STATUS.
These can be sent to the GUI and the GUI will take appropriate actions. The syntax is the following: {"Action": True}
Warning
I do not recommend to send any of these to the GUI by yourself from the measurement plugin ore anywhere else from the program. Except for the ABORT_MEASUREMENT and CLOSE_PROGRAM. On more information on how to correctly use it, see the dedicated chapters.
If you sent a message like: {"MyMeasurement": [[1],[2]]}, with "MyMeasurement" beeing the name of a defined measurement in the config file, the event loop will append these data to the numpy array data it has stored. Furthermore, it will set a flag for the framework to update the plots, so that the data is updated in the GUI.
Note
You are not restricted to a single value list here, you can send everything, that can be appended to a numpy array via the np.append([],[]) function.